【x264视频编码器应用与实现】四. x264-example:自定义x264编码器的实现


摘要:

本文作为“x264视频编码器应用与实现”系列博文的第四篇,主要讨论如何利用编译生成的libx264的库文件实现x264的编码器示例程序。

1. x264的命令行工具与静态库

上一篇中我们已经实现了x264源代码的编译,并且实现了对x264命令行工具(CLI)在xcode中的单步调试。但是一个很容易理解的问题是,x264 CLI 在实际应用场景下几乎没有任何扩展性,除了可以传递的部分参数之外,对整个编码的流程完全无法进行控制与自定义操作。因此,在实际应用的场景中,使用x264相应的库文件,并调用其中的API是更为常用的操作。

关于如何使用x264的库与API,源代码中也为我们提供了可以参考的 demo 程序,即根目录下的 example.c 文件。该文件非常短小精悍,只有142行,整个文件的实现如下(省略头部注释):

1
2
3
4
5
6
7
8
9
10
11
12
13
14
15
16
17
18
19
20
21
22
23
24
25
26
27
28
29
30
31
32
33
34
35
36
37
38
39
40
41
42
43
44
45
46
47
48
49
50
51
52
53
54
55
56
57
58
59
60
61
62
63
64
65
66
67
68
69
70
71
72
73
74
75
76
77
78
79
80
81
82
83
84
85
86
87
88
89
90
91
92
93
94
95
96
97
98
99
100
101
102
103
104
105
106
107
108
109
110
111
112
113
114
115
116
117
118
119
120
121
122
123
124
125
126
127
128
129
130
#ifdef _WIN32
#include <io.h> /* _setmode() */
#include <fcntl.h> /* _O_BINARY */
#endif

#include <stdint.h>
#include <stdio.h>
#include <x264.h>

#define FAIL_IF_ERROR( cond, ... )\
do\
{\
if( cond )\
{\
fprintf( stderr, __VA_ARGS__ );\
goto fail;\
}\
} while( 0 )

int main( int argc, char **argv )
{
int width, height;
x264_param_t param;
x264_picture_t pic;
x264_picture_t pic_out;
x264_t *h;
int i_frame = 0;
int i_frame_size;
x264_nal_t *nal;
int i_nal;

#ifdef _WIN32
_setmode( _fileno( stdin ), _O_BINARY );
_setmode( _fileno( stdout ), _O_BINARY );
_setmode( _fileno( stderr ), _O_BINARY );
#endif

FAIL_IF_ERROR( !(argc > 1), "Example usage: example 352x288 input.yuv output.h264\n" );
FAIL_IF_ERROR( 2 != sscanf( argv[1], "%dx%d", &width, &height ), "resolution not specified or incorrect\n" );

FILE *input_file = fopen(argv[2], "rb");
if (input_file == NULL) {
printf("Error: open input file %s failed.\n", argv[3]);
return -1;
}
FILE *output_file = fopen(argv[3], "wb");
if (output_file == NULL) {
printf("Error: open output file %s failed.\n", argv[4]);
return -1;
}

/* Get default params for preset/tuning */
if( x264_param_default_preset( &param, "medium", NULL ) < 0 )
goto fail;

/* Configure non-default params */
param.i_bitdepth = 8;
param.i_csp = X264_CSP_I420;
param.i_width = width;
param.i_height = height;
param.b_vfr_input = 0;
param.b_repeat_headers = 1;
param.b_annexb = 1;

/* Apply profile restrictions. */
if( x264_param_apply_profile( &param, "high" ) < 0 )
goto fail;

if( x264_picture_alloc( &pic, param.i_csp, param.i_width, param.i_height ) < 0 )
goto fail;
#undef fail
#define fail fail2

h = x264_encoder_open( &param );
if( !h )
goto fail;
#undef fail
#define fail fail3

int luma_size = width * height;
int chroma_size = luma_size / 4;
/* Encode frames */
for( ;; i_frame++ )
{
/* Read input frame */
if( fread( pic.img.plane[0], 1, luma_size, input_file ) != luma_size )
break;
if( fread( pic.img.plane[1], 1, chroma_size, input_file ) != chroma_size )
break;
if( fread( pic.img.plane[2], 1, chroma_size, input_file ) != chroma_size )
break;

pic.i_pts = i_frame;
i_frame_size = x264_encoder_encode( h, &nal, &i_nal, &pic, &pic_out );
if( i_frame_size < 0 )
goto fail;
else if( i_frame_size )
{
if( !fwrite( nal->p_payload, i_frame_size, 1, output_file ) )
goto fail;
}
}
/* Flush delayed frames */
while( x264_encoder_delayed_frames( h ) )
{
i_frame_size = x264_encoder_encode( h, &nal, &i_nal, NULL, &pic_out );
if( i_frame_size < 0 )
goto fail;
else if( i_frame_size )
{
if( !fwrite( nal->p_payload, i_frame_size, 1, output_file ) )
goto fail;
}
}

fclose(input_file);
fclose(output_file);

x264_encoder_close( h );
x264_picture_clean( &pic );
return 0;

#undef fail
fail3:
x264_encoder_close( h );
fail2:
x264_picture_clean( &pic );
fail:
return -1;
}

由于我们在上一篇中生成的是静态库 libx264.a,在这里我们也将使用静态库来运行example.c这个文件,以求对 x264 的整体编码流程有一个大体的认识。


2. 使用Xcode新建x264-example工程

  1. 在 xcode 中新建一个命令行工程:

  2. 将库文件、头文件添加到项目中:

    添加后,我们在工程配置中可以看出,libx264.a 已经被添加到工程中:
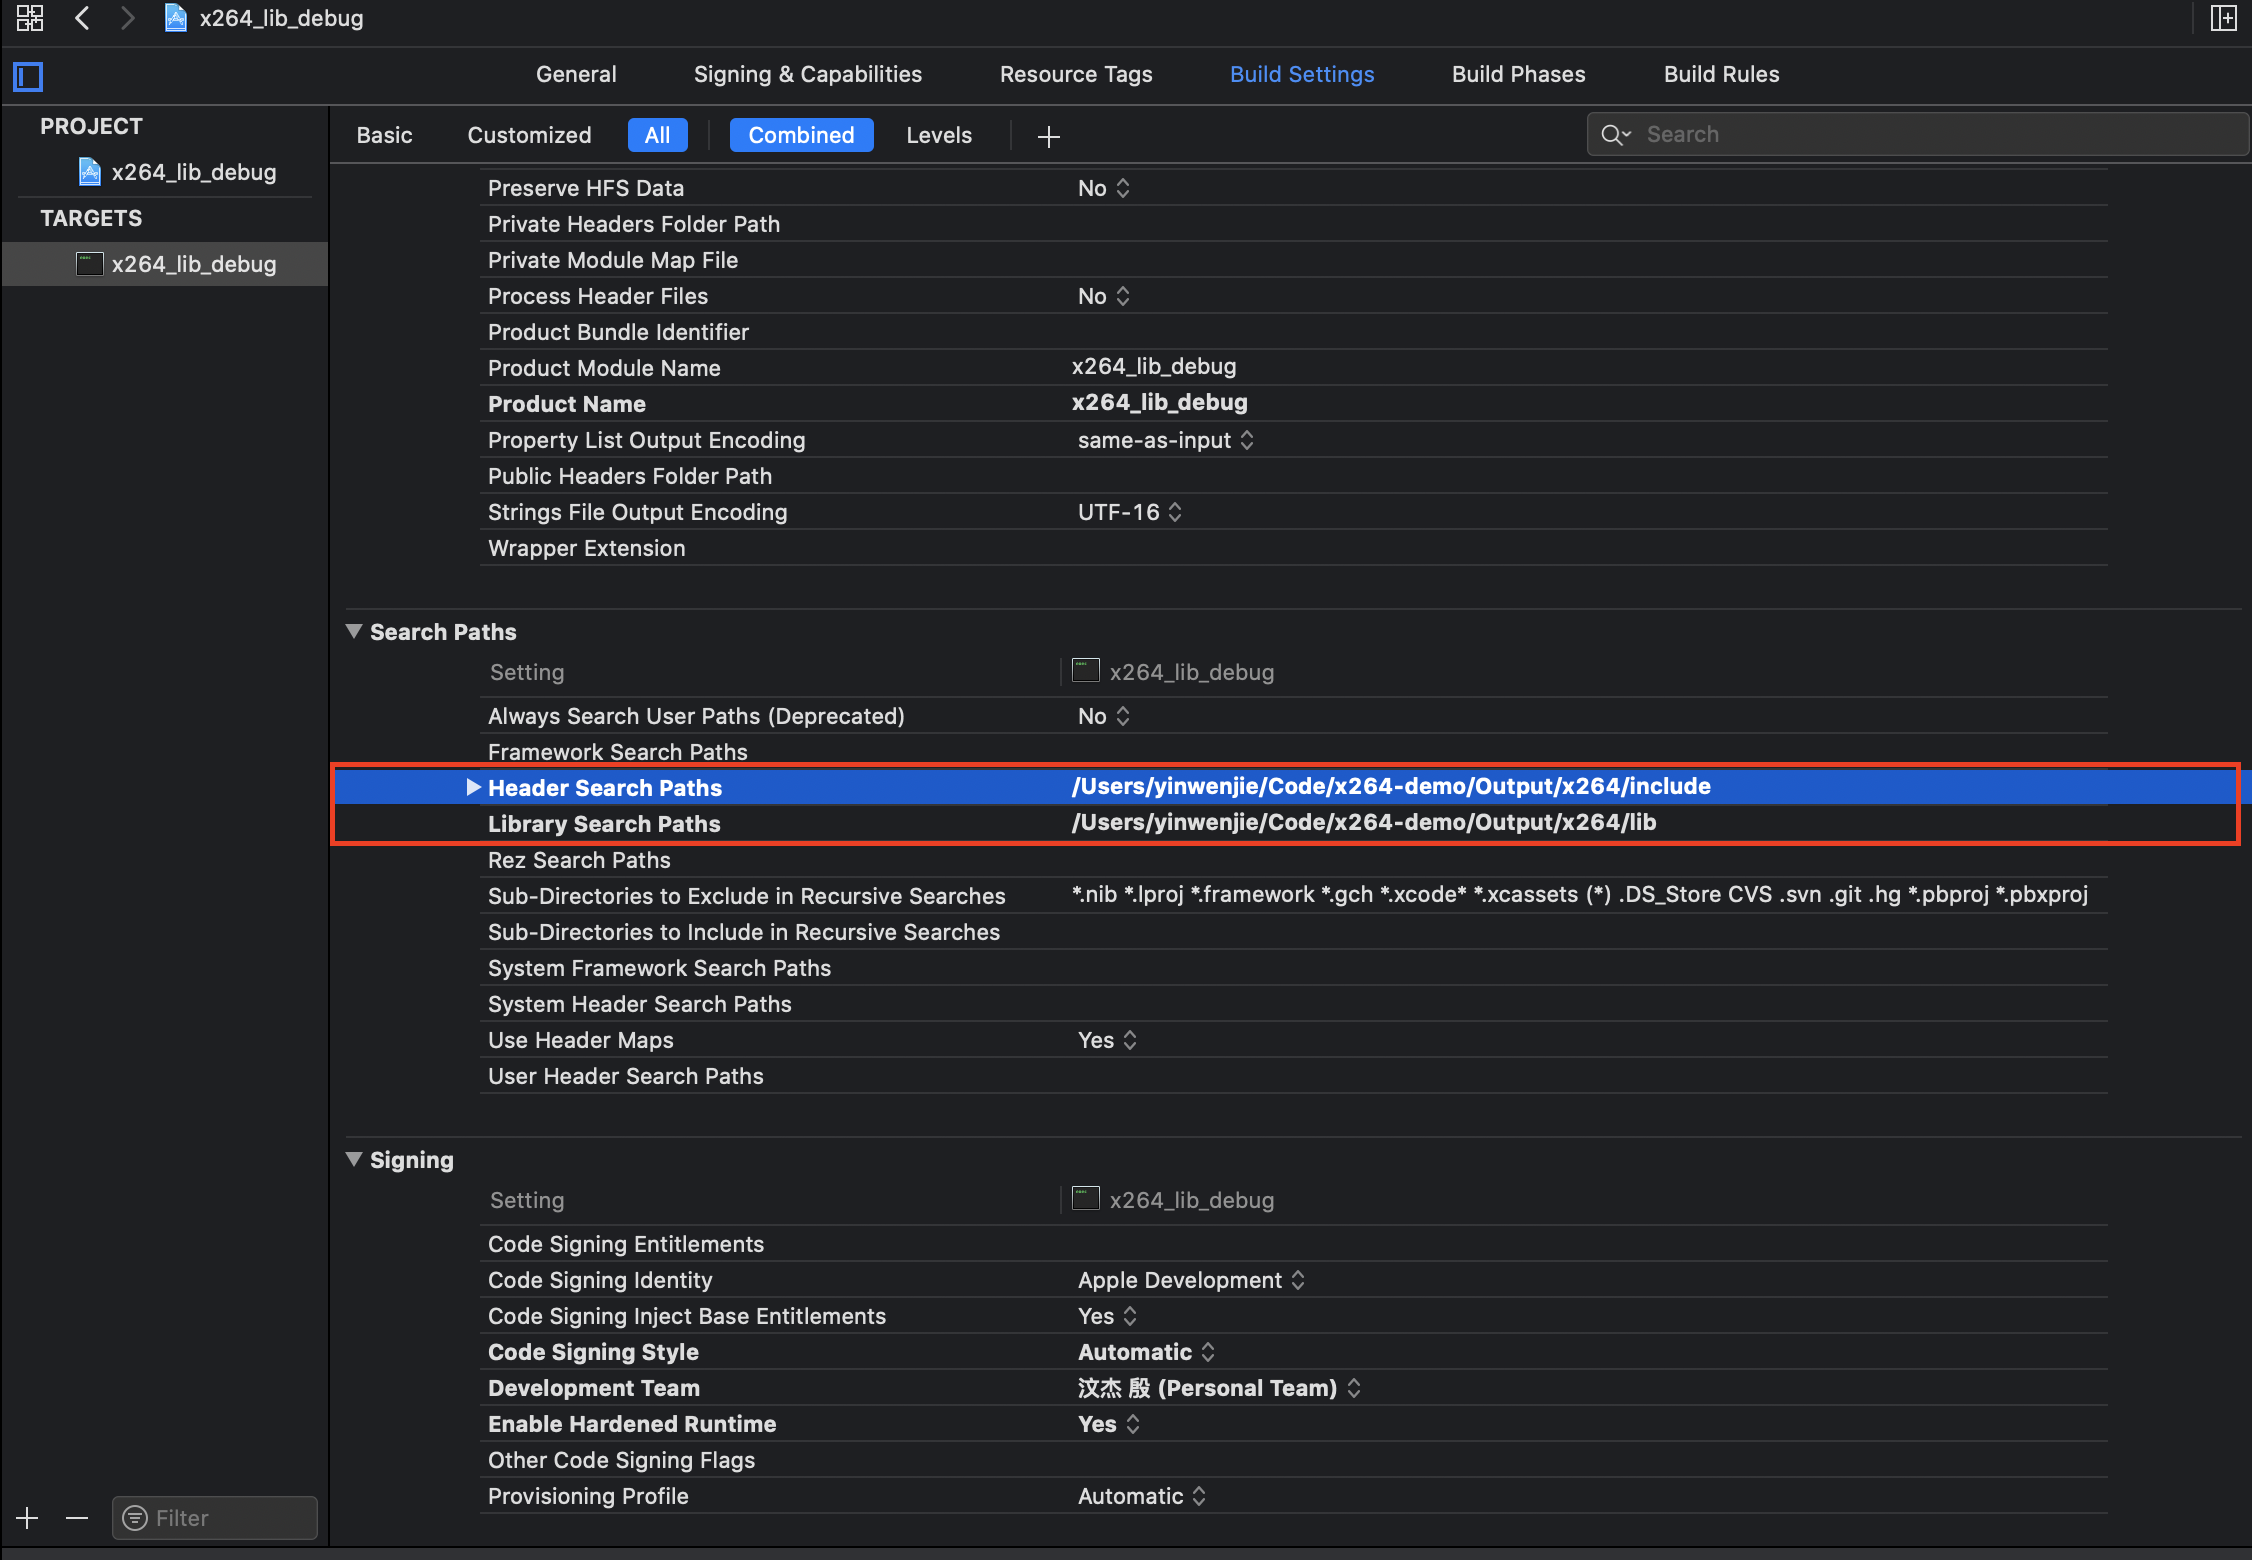
  3. 指定头文件和库文件路径:

  4. 将 example.c 中的内容复制到 main.c 中。

  5. Edit Scheme中指定运行参数,调试运行:

    例如运行参数可以为:

    1
    1280x720 /Users/yinwenjie/Video/input_1280x720.yuv /Users/yinwenjie/Video/lib_output.h264

3. 使用CMake新建x264-example工程

在实际的项目开发中,使用CMake进行工程构建在业界取得广泛应用。CMake是一项开源的跨平台代码构建系统,具有配置灵活、功能强大且易于维护等特点,支持如Linux、Windows和macOS等常见操作系统。在本节中,为了更加适应业界主流的方案,在编译生成了libx264.so以及对应的头文件后,我们使用CMake引用x264库文件并实现x264-example工程。

3.1 配置文件CMakeLists.txt

使用CMake配置工程的核心是配置文件CMakeLists.txt,工程构建过程中几乎所有的步骤都可以通过配置文件CMakeLists.txt控制。在工程目录下创建CMakeLists.txt:

1
2
3
4
5
6
7
8
9
10
11
12
13
14
15
16
17
18
19
20
21
22
23
24
25
26
27
28
29
30
31
32
33
cmake_minimum_required(VERSION 3.5 FATAL_ERROR) # 指定CMake版本
project(x264_encoder LANGUAGES CXX) # 指定项目名称

# 设置编译模式
if(CMAKE_BUILD_TYPE STREQUAL Debug)
message(STATUS "Debug Mode.")
add_definitions(-DDebug)
set(CMAKE_CXX_FLAGS "${CMAKE_CXX_FLAGS} -std=c++11 -o0 -g")
else()
message(STATUS "Release Mode.")
set(CMAKE_CXX_FLAGS "${CMAKE_CXX_FLAGS} -std=c++11 -o2")
endif()

# 设置x264头文件路径
set(x264_include_dir ${PROJECT_SOURCE_DIR}/../x264_output/include)
include_directories(${x264_include_dir})
# 设置x264库文件路径
set(x264_lib_dir ${PROJECT_SOURCE_DIR}/../x264_output/lib)
link_directories(${x264_lib_dir})
# 引入项目头文件和源文件
include_directories(${PROJECT_SOURCE_DIR}/inc)
set(demo_dir ${PROJECT_SOURCE_DIR}/demo)
file(GLOB demo_codes ${demo_dir}/*.cpp)
set(core_dir ${PROJECT_SOURCE_DIR}/src)
file(GLOB core_codes ${core_dir}/*.cpp)

# 编译demo目录中的测试程序
foreach (demo ${demo_codes})
string(REGEX MATCH "[^/]+$" demo_file ${demo})
string(REPLACE ".cpp" "" demo_basename ${demo_file})
add_executable(${demo_basename} ${demo} ${core_codes} ${src_codes})
target_link_libraries(${demo_basename} -lx264)
endforeach()

3.2 工程目录结构和编译方法

工程目录结构如下所示:

1
2
3
4
5
6
7
8
9
.
├── CMakeLists.txt
├── build.sh
├── demo
│   └── video_encoder.cpp
├── inc
│   └── io_data.h
└── src
└── io_data.cpp

其中编译脚本 build.sh的内容如下:

1
2
3
4
5
6
#! /bin/bash
rm -rf build
mkdir build && cd build
cmake -DCMAKE_BUILD_TYPE=Debug ..
make -j8
./video_encoder ~/Video/input_1280x720.yuv 1280 720 output.h264

源代码可参考在线代码仓库:https://gitee.com/yinwenjie-1/x264_encoder


4. 浅析example.c中的代码实现

整个example.c中只有一个用于判断错误退出的宏定义和一个主函数。在主函数main.c中,首先是定义一些变量和结构:

1
2
3
4
5
6
7
8
9
10
11
12
13
14
15
int main( int argc, char **argv )
{
// 定义编码所需的参数和结构:
int width, height;
x264_param_t param;
x264_picture_t pic;
x264_picture_t pic_out;
x264_t *h;
int i_frame = 0;
int i_frame_size;
x264_nal_t *nal;
int i_nal;

// ......
}

上述变量和结构定义完成后,获取或指定编码的参数:

1
2
3
4
5
6
7
8
9
10
11
12
13
14
15
16
17
18
19
20
21
22
23
24
25
26
27
int main(int argc, char **argv)
{
// ......

// 获取 YUV 输入文件的宽高数据
FAIL_IF_ERROR( !(argc > 1), "Example usage: example 352x288 <input.yuv >output.h264\n" );
FAIL_IF_ERROR( 2 != sscanf( argv[1], "%dx%d", &width, &height ), "resolution not specified or incorrect\n" );

/* Get default params for preset/tuning */
if( x264_param_default_preset( &param, "medium", NULL ) < 0 ) // 设置编码默认的 preset 为medium
goto fail;

/* Configure non-default params */
param.i_bitdepth = 8; // 编码比特深度为 8 bit;
param.i_csp = X264_CSP_I420; // 颜色空间指定为 I420格式;
param.i_width = width; // 指定宽高;
param.i_height = height;
param.b_vfr_input = 0; // 使用 fps 作为码率控制的参考
param.b_repeat_headers = 1; // 指定在每一个关键帧前面添加头信息(sps和pps)
param.b_annexb = 1; // 指定输出格式

/* Apply profile restrictions. */
if( x264_param_apply_profile( &param, "high" ) < 0 ) // 指定编码的 profile 为 high profile
goto fail;

// ......
}

随后需要做的工作是,按照图像的格式和大小分配相应的内存空间,并打开编码器对象:

1
2
3
4
5
6
7
8
9
10
11
12
13
14
15
16
17
18
int main(int argc, char **argv)
{
// ......
// 为输入的图像结构分配内存空间
if( x264_picture_alloc( &pic, param.i_csp, param.i_width, param.i_height ) < 0 )
goto fail;
#undef fail
#define fail fail2

// 打开编码器实例
h = x264_encoder_open( &param );
if( !h )
goto fail;
#undef fail
#define fail fail3

// ......
}

接下来便是程序中最重要的编码循环体:

1
2
3
4
5
6
7
8
9
10
11
12
13
14
15
16
17
18
19
20
21
22
23
24
25
26
27
28
29
int main(int argc, char **argv)
{
// ......
int luma_size = width * height; // 计算一帧亮度图像的大小
int chroma_size = luma_size / 4; // 计算一帧色度图像的大小
/* Encode frames */
// 编码循环体
for( ;; i_frame++ )
{
/* Read input frame */
if( fread( pic.img.plane[0], 1, luma_size, stdin ) != luma_size ) // 读取亮度Y数据
break;
if( fread( pic.img.plane[1], 1, chroma_size, stdin ) != chroma_size ) // 读取色度U数据
break;
if( fread( pic.img.plane[2], 1, chroma_size, stdin ) != chroma_size ) // 读取色度V数据
break;

pic.i_pts = i_frame;
i_frame_size = x264_encoder_encode( h, &nal, &i_nal, &pic, &pic_out ); // 编码一帧图像
if( i_frame_size < 0 )
goto fail;
else if( i_frame_size )
{
if( !fwrite( nal->p_payload, i_frame_size, 1, stdout ) ) // 码流写出到输出文件中
goto fail;
}
}
// ......
}

当输入的YUV文件读取完成后,还需要继续进行编码以输出还在编码器中的剩余视频码流数据,也就是俗称的flush操作,其主要流程与编码过程类似:

1
2
3
4
5
6
7
8
9
10
11
12
13
14
15
16
17
int main(int argc, char **argv)
{
// ......
/* Flush delayed frames */
while( x264_encoder_delayed_frames( h ) )
{
i_frame_size = x264_encoder_encode( h, &nal, &i_nal, NULL, &pic_out );
if( i_frame_size < 0 )
goto fail;
else if( i_frame_size )
{
if( !fwrite( nal->p_payload, i_frame_size, 1, stdout ) )
goto fail;
}
}
// ......
}

最后,在全部编码完成后,进行编码器的释放以及输入图像内存的释放:

1
2
3
4
5
6
7
8
9
10
11
12
13
14
15
16
int main(int argc, char **argv)
{
// ......

x264_encoder_close( h );
x264_picture_clean( &pic );
return 0;

#undef fail
fail3:
x264_encoder_close( h );
fail2:
x264_picture_clean( &pic );
fail:
return -1;
}

Author: Yin Wenjie
Reprint policy: All articles in this blog are used except for special statements CC BY 4.0 reprint polocy. If reproduced, please indicate source Yin Wenjie !
 Previous
【x264视频编码器应用与实现】五. x264编码参数与初始化 【x264视频编码器应用与实现】五. x264编码参数与初始化
摘要:本文作为 “x264视频编码器应用与实现” 系列博文的第五篇,主要讨论x264中参数结构及其设置方法。
2021-12-24 Yin Wenjie
Next 
【x264视频编码器应用与实现】三. x264源代码的下载、编译和调试 【x264视频编码器应用与实现】三. x264源代码的下载、编译和调试
摘要:本文作为“x264视频编码器应用与实现”系列博文的第三篇,主要讨论如何从官方镜像下载x264的源代码,并进行编译和调试。
2021-10-14 Yin Wenjie
  TOC